Showing posts with label PARTY SNACKS. Show all posts

Monday, December 3, 2012

EASY BUTTERSCOTCH ICE CREAM TOPPING

EASY BUTTERSCOTCH ICE CREAM TOPPING
  • ¼ cup butter
  • 1¼ cups light brown sugar (packed)
  • 16 large marshmallows
  • 2 tablespoons light corn syrup
  • dash of salt
  • 1 cup of evaporated (canned) milk
  • 1 teaspoon vanilla extract
  • 1/2 teaspoon rum extract

Melt the butter in a saucepan over low heat. Stir in the sugar, marshmallows, corn syrup and salt.

Stirring constantly, keep your heat very low until everything is melted and smooth then raise the heat to a medium low setting. Bring to a gentle boil (keep stirring) and boil for 1 minute.

Remove from heat and cool for five minutes. Stir in evaporated milk and extracts, mix until everything is very smooth.


Store in fridge (keeps for a couple weeks if it lasts that long). Tastes great cold or warm.

QUICK and EASY STICKY CHICKEN WINGS

2 pounds of chicken wing sections
½ cup soy sauce
½ cup brown sugar
½ teaspoon black pepper
pinch of red pepper flakes (optional)
20 ounce can of pineapple chunks (drained well)

Cut the wings into sections, discarding the wing tip (or buy already cut up party wings) and place in a 9" x 13" (greased) baking dish.  Mix everything else together and spoon over the wings.

Bake in a 350 oven (uncovered) for 1½ hours, turning everything over every 30 minutes or so. Now I know that seems like a LONG time for chicken wings, but trust me, it does takes that long for the wings to "break down" and be super tender, sweet and juicy and sticky!!

Remove the wings and pineapple from the sauce and serve  (discard the sauce). Hubby likes the pineapple chunks, but I don't care for them...your choice.

NOTE: Do not omit the pineapple, the flavor and moisture content of the fruit is important to the cooking process.

NOTE:  The last 30 minutes of bake time, the chicken wings will get shiney and sticky!!

NOTE: If you are still in doubt about the 1½ hour cooking time, click on the above photo and you will get a better look at the wings themselves and you will see they are juicy and not overcooked.

Saturday, December 1, 2012

HOT SPINACH and ARTICHOKE DIP


  • 8 ounce cream cheese (low fat ok)
  • 1/4 cup sour cream (low fat ok)
  • 1/4 cup Parmesan cheese (grated, not powdered)
  • 1/4 cup Romano cheese (grated)
  • 2 cloves garlic minced (I used roasted from jar)
  • 1/2 teaspoon dry basil
  • 1/4 teaspoon garlic salt
  • salt and pepper to taste
  • (1) 14 oz. can artichoke hearts (rinsed)
  • 1/2 cup red bell pepper (chopped finely)
  • 10 ounces fresh baby spinach
  • 1/4 cup shredded Monterrey Jack cheese

Plunge fresh spinach into boiling water for about 30 seconds, remove and put into large bowl of ice water to stop the cooking. Drain and squeeze dry and roughly chop.

Drain the artichokes and rinse under cold running water, then chop into small pieces.

Mix everything together and place in a (lightly greased) small oven proof dish. Bake at 350F for 25 minutes. Serve with pita chips or any sturdy cracker.

NOTE: This can also be baked in a hollowed out bread bowl instead of a baking dish.  

Sunday, February 12, 2012

CHEESE PUFFS

Your guests will think you are a whiz in the kitchen when you serve these cheese puffs, but they are quick and easy to make and oh so good!!

Made from a basic cream puff dough and grated cheese, these bite size treats are FULL of air pockets and have a crispy-cheesy outer crust.  You can eat them right out of the oven, or get imaginative and fill them with anything savory.

1 cup milk
4 tablespoons unsalted butter
¼ teaspoon salt
pinch of cayenne pepper (or more if you like)
1 cup all purpose flour
3 large eggs at room temperature
½ teaspoon paprika (not the spicy kind)
½ cup grated Parmesan cheese (not the powdered kind)
1½ cups grated Gruyere cheese (see note)
coarse salt to sprinkle on top (see note)

Combine the milk, butter, ¼ teaspoon salt and cayenne in a saucepan and bring it to a boil. Once it starts to boil, remove it from the heat and add the flour all at once (mixing like crazy with a sturdy spatula) until the mixture comes together like this:
Return the pan to the heat and cook over medium heat for about a minute to dry out any excess moisture (stirring).

Remove from heat and put into a food processor and let it cool for five minutes. After the five minutes, process the dough for about 5 seconds. Add the paprika and eggs (one egg at a time) mixing well after each egg.

Remove from food processor and let dough cool for about 10 minutes. Mix in grated cheese and stir just enough to mix well.

Using a measuring tablespoon, scoop out a LEVEL TABLESPOON of the dough and push it off of the spoon (with your finger) onto a parchment paper lined baking sheet (try and keep the puffs as round as possible (but it isn’t critical).

Place them about 2” apart. Top each puff with a pinch of Parmesan and just a mini-pinch of coarse salt (see note below). Bake at 375° for 30 minutes (watch them the last 2 or 3 minutes so they don’t get too dark).

Serve warm or at room temperature. Just as soon as they come out of the oven, pierce the side of the puff with the tip of a small knife (to let any steam escape), this will keep them crispy longer.

Click on this photo to get a better look at the interior of the puffs

 NOTE: Make sure you have everything ready to go before you start making these puffs (cheese grated, flour measured, etc.) so that the liquid volume doesn’t boil away while you are grating your cheese, etc.

NOTE: Let the batter cool a little before you add the eggs so they don’t cook when they hit the hot dough.

NOTE: Lets talk about cheese. You can use any cheese you want but your results will vary significantly, depending on what kind you use.  The dough will puff up best when you use a hard, dry cheese.  If you use a wet cheese, like cheddar, your puffs MIGHT try to deflate when you take them out of the oven. They will still taste good, but they might not be crispy.

NOTE: If you are going to use the traditional Gruyere cheese…note that there are several different kinds of Gruyere. You want the dry hard one, not the semi-soft one.

NOTE ABOUT SALT: The recipe calls for a pinch of coarse salt on the top of each puff, but we don’t care for that…the Parmesan and Gruyere are pretty salty already.

This sounds like a lot of hassle, but once you make these, you will see that they are a snap and I have only one warning…they are addictive!!

Friday, September 2, 2011

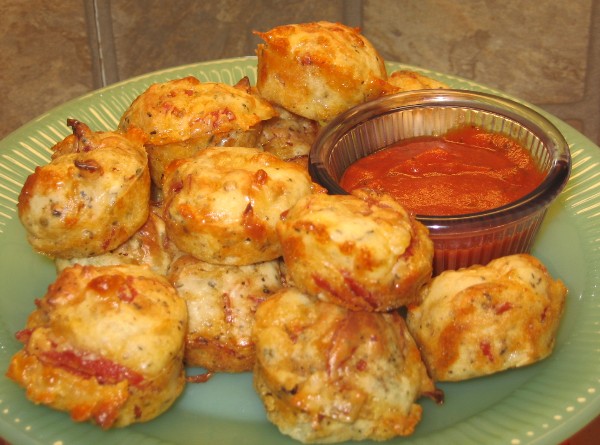
PIZZA PUFFS

In these rocky financial times, I've been trying to save on the grocery budget by staying away from pre-prepared foods. Not only has it saved us some money, but we really enjoy knowing what ingredients are going into our favorite (junk) comfort foods.

PIZZA PUFFS

3/4 cup flour
3/4 teaspoon baking powder
3/4 cup whole milk
¼ teaspoon salt
1 egg, lightly beaten
4 ounces mozzarella cheese, shredded (about 1 cup)
4 ounces pepperoni, cut into small cubes (about 1 cup)

1 cup favorite pizza sauce for dipping  (warmed up)
Preheat the oven to 375°. Grease a 24-cup mini-muffin pan. In a large bowl, whisk together the flour and baking powder; whisk in the milk and egg. Stir in the mozzarella and pepperoni; let stand for 10 minutes.


Stir the batter and divide among the mini-muffin cups. Bake until puffed and golden, 20 to 25 minutes.

Meanwhile, microwave your favorite pizza sauce until warmed through. Serve the puffs with the pizza sauce for dipping.

Tuesday, June 14, 2011

ZIPPY CHEESE CRACKERS

These crackers are super easy to make and are a very nice addition to any snack tray or buffet table. I used sharp cheddar cheese in this photo, but pepper jack cheese makes an excellent cracker as well.


8 ounces shredded SHARP cheddar cheese (or pepper jack)
½ cup butter at room temperature
1 ½ cups flour
½ teaspoon salt
¼ teaspoon black pepper
pinch of cayenne pepper (leave out if you use pepper jack)
2 tablespoons water

Preheat oven to 350°. Mix above ingredients with electric mixer for 1 minute. This will look dry and crumbly, but thats ok. Pour out onto counter and squeeze ingredients together; form into a nice smooth 12” log.

Wrap in plastic wrap and chill at least a couple hours. Cut thin slices and place on parchment paper lined cookie sheet. Poke a few holes in each cracker with fork tines and sprinkle with a little kosher style salt. Bake for 20 minutes. Cool completely before eating.

NOTE: I usually chill my dough overnight.

NOTE: You can bake part of these and keep the rest of the dough in the fridge for up to a week (covered well).

NOTE: Original recipe said to slice these ¼” thick, but we didn’t like them at all. I sliced them a lot thinner and it was a huge improvement!!!

Thursday, May 19, 2011

PECAN PIE MINI-MUFFINS

These little gems taste just like a Pecan Tassie. They are made out of 6 every day ingredients and are great with a morning cup of tea, or the lunch box or a long car ride (not at all messy). These are Hubby's "new" favorite snack. Store covered.
1 cup light brown sugar
½ cup flour
2 eggs
2/3 cup soft butter
½ teaspoon vanilla
1 cup chopped pecans

Preheat oven to 350°. Grease and flour a mini muffin pan (or spray with a cooking spray that has flour in it, like Bakers Joy). Mix the wet ingredients in a medium size bowl and then stir in the dry ingredients, its just that simple!!

Mix long enough to just get the batter smooth. Make sure you use the MINI muffin pans (not cupcake size). Fill cups with one tablespoon batter each (makes 24). Bake for 17 minutes.

NOTE: Dusting pan with flour is important.

NOTE: My oven cooked these in 16 minutes.

NOTE: Taking these out of the pan is the only (mildly) tricky part of this recipe. Letting the muffins cool for 2 or 3 minutes before you try to remove them from the pan will help a lot, but don't leave them in the pan longer than than that, since they will get harder to remove from the pan as they cool.

NOTE: Slide a  thin knife gently around the sides of the muffins, then gently lift them out using the knife.

NOTE: If you keep these muffins covered well, they will stay soft for a long time (they tend to get a little crispy around the edges if left out in the air).

Thursday, January 13, 2011

BAKED ONION RINGS

Don't let this terrible photo fool you, these onion rings are deliciously addicting!! I found this recipe on Donna's blog over at My Tasty Treasures. There are only 2 tablespoons of oil in the whole batch, but you would never know it; this recipe is a keeper!!


The onion rings bake up light as air, super crispy and packed with flavor!!
.
1 medium size vidalia onion
1½ cups corn flakes
½ cup plain dry bread crumbs (I used Panko)
1 large egg
½ cup low fat buttermilk
¼ cup flour
1/8 teaspoon cayenne pepper
pepper to taste
.
Put the corn flakes and bread crumbs in the food processor and pulse until you get fine crumbs (set aside).
.
Mix the egg, buttermilk, flour, cayenne & black pepper. Cut the ends off of the vidalia onion and then cut the center of the onion into four thick slices. Separate the rings.
.
Dip the raw onion rings into the batter and set them on a baking rack so the excess batter will drip off (put a baking sheet under the rack, or set the whole rack in the sink to help reduce any mess).
.
Put 2 tablespoons olive oil (I used canola oil) on a rimmed baking sheet and put it in the oven for 2 minutes to preheat. After 2 minutes, remove the pan and tilt it to redistribute the oil. Coat the battered rings in the fine dry crumb mixture and place on the baking sheet.

Bake for 16 minutes in a 450 degree pre-heated oven (turn them over half way through). Remove from oven and sprinkle with coarse salt.

NOTE: I don't know if these would be as good with a plain yellow onion. I used vidalia's because they are our favorite. Any sweet onion would work.

Monday, May 10, 2010

BROWNIE BITES

So what does a baker do to celebrate her 60th birthday? She bakes something SHE really likes!!! I found this little recipe gem on My Tasty Treasures last winter; she calls them Fudge Brownie Cups; I call them addictive!!! Donna frosts hers with melted Hershey's chocolate, but since I made these for my birthday, I frosted them with my all-time favorite chocolate cream cheese frosting. These little beauties are moist and chocolatey and so easy to pop in your mouth. My son calls them "wicked good". Fortunately for me...as all bakers know, calories consumed on your birthday do not count!!! 2 sticks butter, room temperature
12 ounces semisweet chocolate chips
1 + 1/3 cups firmly packed light brown sugar
2 teaspoons vanilla extract
4 eggs
20 tablespoons flour
Lightly butter mini-muffin pans (my tip*I used Bakers Joy spray). Melt together, butter, semisweet chocolate and brown sugar in a pan over low heat, stirring constantly until mixture is smooth (*keep it as cool as possible).
.
Remove from heat and beat in vanilla, then eggs, one at a time, stirring until well mixed. Fold in flour and blend well. (*let this batter sit for about 10 minutes before you bake it and it will be easier to work).
.
Spoon one (*rounded) measuring teaspoonful into each spot. Bake in preheated 350F oven for 10 to 12 minutes (*my oven took exactly 11 minutes). Remove and cool completely.
NOTE: grease or spray pans between each batches of brownie cups. This recipe makes 60.
.
CREAM CHEESE FROSTING
¼ cup soft butter
½ cup baking cocoa
8 ounce cream cheese (room temperature)
1 teaspoon vanilla extract
4 cups powdered sugar
.
The butter needs to be really warm, but not melted. Stir the cocoa into the butter and mix well; whip in the cream cheese & add vanilla, scraping the sides of the bowl frequently so that you get a nice smooth butter-cocoa-vanilla-cream cheese mixture. Beat in the powdered sugar, one cup at a time, beating until really smooth in between each cup.
~~~~~~~~~~~~~~~~~~~~~~~~~~~~~~~~~~~~~~
So what is it like to turn 60? Not as stressful as I anticipated.
What am I going to do for my birthday? Relax and let Hubby grill.
What do I want for my birthday? Hugs and kisses from my husband, children and grandchildren...other than that, I have everything I've ever wanted...oh! wait!! Not quite everything I've ever wanted...I've always wanted a white picket fence, but that's more of a June Cleaver dream I think. Come to think of it, I DO have everything I've ever wanted (except those kisses!!).

Monday, March 29, 2010

BACON & CHEESE DEVILED EGGS FOR EASTER BRUNCH

If you are looking for a deviled egg recipe that is just a little different, this is a good one. The filling has crisp bacon and cheddar cheese in it and it is a great change. The filling is done in the food processor which produces a very creamy texture. I forgot to take a better photo of these before they went on the party table, but I quick snapped this one to give you an idea of how I decorated them.
12 hard boiled eggs
½ cup favorite salad dressing (I use mayonnaise)
4 strips of crisp fried bacon
¼ cup shredded cheddar cheese (I used medium)
1 level tablespoon prepared yellow mustard
2 tablespoons pickle juice (favorite flavor)
extra bacon for decoration (optional)
Cut the boiled eggs in half and put the yolks, salad dressing, bacon, cheese and mustard into a food processor. Process until it starts to get smooth, then...while running, pour in the pickle juice and process for another 20 seconds. This extra processing time will chop the bacon and cheese small enough AND it gives the filling a wonderful feel on the tongue.
Fill the egg white halves and top with a small piece of crisp bacon.

Friday, January 1, 2010

STUFFED MUSHROOMS

I made this recipe, for the first time, on Christmas Eve and they were a big hit. I put the recipe together, early in the day and just popped them in the oven for 25 minutes just before dinner. Super simple and absolutely delicious.

12 whole (large) fresh mushrooms

Clean mushrooms and carefully break off stems and reserve. Using a melon baller, scoop the rest of the stem and gills out, making a nice big pocket in the mushroom.
1 tablespoon canola oil
1 large clove garlic minced (more if you like)
(1) 8 ounce package cream cheese, softened
¼ cup grated Parmesan cheese (not powdered kind)
¼ teaspoon black pepper
¼ teaspoon onion powder
¼ teaspoon ground cayenne pepper
Trim off any hardened parts of the mushroom stems and chop the good part of the stems (and gill trimmings) very fine, using a food processor.
Saute the finely chopped stems and pieces in canola oil until all moisture has evaporated (add the garlic to the pan about half way through this step so you don't burn it). Set this aside to cool a little.
When the mushroom-garlic mixture has cooled, mix in the cream cheese, Parmesan, black pepper, onion powder and cayenne pepper; mix very well (it will be very thick). Fill the mushroom caps generously, piling it high on each cap. Place the stuffed mushrooms on a lightly sprayed baking dish (don't let them touch each other) and bake at 350 for 20-30 minutes depending on how large your mushrooms are. Let them sit for a few minutes before serving.
NOTE: I made a double batch (24) of 2½" wide mushrooms (as a side dish) and served it to 8 adults and had no leftovers...so make plenty...they are really good.
Happy New Year!!!
Thank you very much for your kind words of encouragement and support; it means the world to me. Coleen

Monday, September 28, 2009

PIZZA ROLLS - A QUICK PARTY SNACK

What do you make, when you should have gone grocery shopping yesterday, and hubby says "whats to snack on?" Hmmmm, well, I did a quick check of what I had on hand and came up with this idea. The possibilities are endless; tuck in a few chopped mushrooms or pieces of broccoli, or if you aren't in the mood for pizza, fill them with cooked chicken and Alfredo sauce?

This really isn't a "recipe" as much as it is an idea. Make sure you buy the large egg roll wrappers (they are great to have on hand since they stay good in the fridge for a long time).
First, sliver the pepperoni and shred the cheese. If you use any other meat or veggie, make sure you cut it fairly small so that the cheese and sauce can melt around it (the filling will get hotter if you keep the ingredients on the small side as well).

In one corner of the wrapper, stack meat first, then cheese and sauce on top, then fold the point of the corner over the filling and tuck in the sides of the wrapper and roll them up. When you are done rolling, you will come to the pointed corner of the wrapper. "Glue" the wrapper point onto the pizza roll with a slurry of flour and water (should be the consistency of Elmer's Glue).


Fry these pizza rolls in canola oil at about 350 degrees. Watch the first few carefully since they brown very fast. If they seem to be browning too fast, turn the heat down a little.

These are addictive, and we enjoyed them dipped in ranch dressing.
NOTE: If you need a pizza sauce recipe, I hope you will try mine (CLICK HERE)
NOTE: If you need a ranch dressing recipe, I hope you will try mine (CLICK HERE)
NOTE: These can be assembled early in the day and refrigerated until it is time to cook them.

Tuesday, August 11, 2009

HOME MADE TATER TOTS

This recipe is one the kids will get a kick out of...home made tater tots!! Super quick & simple to make, they are a mixture of chopped potatoes, shredded cheddar, egg, flour, seasonings and fried crisp in a little oil. They are excellent dipped in your favorite barbecue or ranch dressing...inexpensive too!!


2 medium Russet potatoes (see note)
1 cup shredded cheddar cheese (don't pack)
1/3 cup all purpose flour
1 teaspoon seasoning salt
1/4 teaspoon onion powder
1/4 teaspoon black pepper
1 beaten egg

Peel and cube potatoes into your food processor bowl. Pulse them a few times but don't chop them so fine that they become mush. (First picture is the cube size, second picture is the desired chopped size)
In a bowl, mix the chopped potatoes & 1 cup of loosely packed shredded cheddar cheese. Thoroughly mix in the flour (make sure everything is coated). Then add the rest of the ingredients and mix well. Let this mixture sit for about 5 minutes before you fry them. Heat 1/2" vegetable oil to 375.

Scoop spoonfuls of the potato mixture and compress it a little with your fingers while it is on the spoon. Push the "tater tot" off of the spoon (gently) into the shallow (hot) vegetable oil. Fry until golden brown (about 2 minutes per side). Season with salt while still hot.

NOTE: For those of you who live in Alaska, I don't think our Alaska potatoes would work very well in this recipe (the hold too much water and won't crisp up). Recipe calls for Russet (or baking potatoes).
NOTE: For a variation, I am going to try pepper Jack cheese in this recipe instead of the cheddar. I'll let you know how it goes.

Tuesday, July 21, 2009

HOT SOFT PRETZELS

I love hot pretzels, especially nice big puffy ones. This recipe is not hard at all, but it does have a few pesky steps. The pretzels are deliciously chewy on the outside and soft and fluffy on the inside and you can top them with just about any seed or seasoning you prefer. I made these with toasted sesame seeds and a light sprinkle of coarse ground salt. This recipe makes 8 large pretzels.


1 & 1/2 cups warm water
1 tablespoon white sugar
2 teaspoons kosher salt
1 generous tablespoon of dry yeast
4 cups all purpose flour (divided)
2 tablespoons canola oil


In your stand mixer, mix two cups of the flour, sugar, yeast and kosher salt. Pour the warm water and oil over the top and mix with wooden spoon until all ingredients are wet. Let this stand for about 10 minutes.


Attach the dough hook to your mixer and gradually beat in the additional 2 cups of flour (1/2 cup at a time). If dough is still sticky after you get the 4 cups of flour mixed in, had a little more flour (tablespoon at a time) until the dough pulls cleanly away from the inside walls of your mixing bowl. Once it does that, knead on low for about five minutes (see note).


Remove the dough from your mixing bowl and spray the inside of the bowl with vegetable spray; return the dough to the bowl and spritz the top of the dough with vegetable spray; cover the bowl with plastic wrap and let dough sit for an hour or until it doubles in size.


Preheat your oven to 450. Line two large baking sheets with parchment paper and spritz the paper with vegetable spray then rub a paper towel over the parchment paper to remove excess spray. Set aside.


Punch down the dough and cut it into 8 pieces. Roll out each piece into a 24" rope and twist it into a pretzel shape (pinching ends together tightly). Place pretzels on the prepared parchment paper.


In a large (wide bottomed sauce pan), bring 10 cups of water + 2/3 cup baking soda to a rolling boil (it will really bubble). Gently place one of your pretzels onto a slotted FLAT spatula and gently lower the spatula (with pretzel) into the boiling water. Shake the spatula very gently and the pretzel will float off into the water. COOK ONLY ONE PRETZEL AT A TIME.


Boil each pretzel for 30 seconds then gently lift it back out of the water and (before you put it BACK on the parchment paper) rest the slotted spatula/pretzel gently on a kitchen towel (for a couple of seconds) so that it will absorb any water drips......THEN put it back on the parchment paper. Repeat this process for each pretzel.


When all pretzels have been through the water bath, gently brush the tops of them with egg wash (1 egg yolk beaten with 1 tablespoon water) and sprinkle with salt and/or seeds.


Bake in 450 oven for 12 minutes or until they are dark golden brown. Cool on a wire rack for five minutes before serving.
Not the best for you, I'm sure, but the cheese dip recipe that is on the back of the Velveeta box is still my favorite: 1 pound of Velveeta (cubed) + 8 ounce jar of your favorite salsa. Mix and microwave on high until cheese is really melted (about 4 or 5 minutes...stir once in a while). When it's completely melted, add 2 tablespoons chopped cilantro. Yum!

This evening, hubby had sweet chicken wings for dinner (not my favorite) so I sliced one of the big pretzels and made an egg salad sandwich with it. Oh man, what a sandwich!

NOTE: I have not tried it, but I do not see why the initial dough mixing and kneading couldn't be done with a bread machine.
NOTE: Be very gentle with the pretzels when you transfer them from the boiling water back to the parchment paper lined baking sheet.

Friday, July 3, 2009

FRESH HERB & VEGGIE DIP

I learned to cook with dried herbs because fresh herbs were not always available where I live. Fresh herbs not only measure differently, but they taste entirely differently, so learning to cook with them is an on-going process for me.

This summer, I have several pots of herbs growing fairly successfully. I am growing rosemary, thyme, basil, chives, sage, oregano and apple mint. I am on the search for recipes calling for fresh herbs, so if you have a favorite one to share, please let me know.
Many of us will be entertaining company over the 4th of July. This is a recipe for a very light tasting cream cheese dip, using fresh herbs. It is sure to please your company.

FRESH HERB and VEGGIE DIP
12 ounces of whipped cream cheese spread
2 tablespoons finely chopped fresh chives
1 tablespoon finely chopped fresh oregano leaves
1 tablespoon finely chopped fresh thyme leaves
1/8 teaspoon cayenne pepper
dash of salt
1/2 cup shredded carrots
1/4 cup green onions (sliced extremely thin)
3 radishes diced very small

Mix everything in a small bowl and let it sit (covered) in fridge overnight. Serve
with crackers, pretzels or raw veggies.

NOTE: Next to my herb garden, I have a large planter of catnip growing; it is just starting to show a few small blue flowers. Our cat, as well as our neighbors cat, sit next to it and purr loudly while they rub up against the planter, lol.


I think Tabitha's had enough catnip for today...don't you??

Monday, June 29, 2009

SPEEDY SZECHWAN SHRIMP

Szechwan shrimp is supposed to be pretty spicy, but we are "heavy-spice" cowards, so I adjusted the heat WAY down on this recipe and it was still very tasty. It is nice, light and healthy and made a great Sunday meal served over my garden rice.

Peel and devein a pound of large shrimp and set aside.

In a bowl, mix the following and set aside.
4 tablespoons water
2 tablespoons ketchup
1 tablespoon soy sauce
2 teaspoons cornstarch
2 teaspoons honey
1/2 teaspoon crushed red pepper flakes (I used a scant 1/4 tsp.)
1/4 teaspoon ground ginger (I used some fresh ginger)

Heat 1 tablespoon of canola oil in a large skillet, over medium high heat and add 1/4 cup sliced green onions and 2 cloves of minced garlic. Saute the onions and garlic about 30 seconds then throw in the shrimp and saute them for a couple minutes or until pink. Stir in the sauce and cook until the sauce thickens up (it will just take a minute at most).

NOTE: Since I was sure that the sauce was going to be too spicey for hubby, I took the shrimp out of the sauce and put them under the broiler to crisp them up a little, but that's not necessary. The sauce was excellent tasting if you can handle the heat. I served these over garden rice.

GARDEN RICE
In a large sauce pan that has a tight fitting lid, saute half of a small sweet onion (diced) and half cup diced celery in 1 tablespoon butter or canola oil. Stir in one cup of raw long grained rice and coat the rice with the butter. Add one cup (diced) of your favorite veggies (I usually use a frozen mixed veggie) and one ear of corn sliced into one to two inch sections. Add 1 and 1/2 cups of chicken broth and 1/2 teaspoon of black pepper. Bring to boil, stir, put lid on, lower heat to a simmer and cook for 20 minutes. After 20 minutes, turn off heat and let it sit for 5 minutes. Serve shrimp over garden rice.

NOTE: We love corn on the cob "coins" cooked in chicken broth right along with the rice and other veggies. It gives the corn a wonderful flavor.

Friday, June 12, 2009

CANDIED APPLES

What says summer fun, more than candied apples? They are very easy to make (if you follow a few tips at the end of this post) and would be a nice addition to any summer birthday party, barbeque or even for a 4th of July picnic!

The ingredients are very basic:
10 small (snack size) apples
10 popsicle sticks
2 cups white sugar
1 cup light Karo syrup
1 & 1/2 cups water
1/2 teaspoon cherry UNsweetened Kool Aid powder

Wash any wax or soil from the apples and thoroughly dry them (remove stems). Insert wooden stick into the stem end of the apple (push about half way into the apple).

Line a baking sheet with waxed paper and spray it with cooking spray (keep this close to your work station).

In a medium size, heavy-bottomed sauce pan, attach your candy thermometer and make sure that the glass tip is not setting on the bottom of the pan (it will give you a false reading). Put all of the candy ingredients in the pan and cook on medium high, stirring constantly, until it comes to a boil. DO NOT STIR THIS AFTER IT COMES TO A BOIL. Turn the heat down just a little, so that you have a nice gentle boil and then keep an eye on the thermometer. Cook until it hits 300 or hard crack stage; this can take up to 30 minutes, but on my stove it takes about 25. Keep a close eye on the candy after it reaches 285 because those last 15 degrees go faster than you think. DO NOT STIR!!

Remove the pan from the heat and work fast. Holding the apple by the stick, dip it into the pan (hold the pan at a tilt, so the candy will "pool". Twirl the apple and then let the candy drip off of the apple for a few seconds and then place on the prepared waxed paper. DON'T GET THIS STUFF ON YOUR SKIN!!!!! Apples will be hard and ready to use five to ten minutes after they are dipped. If you are going to add sprinkles or any decorations, you will have to add them with lightening speed because these cool off and become hard FAST (an extra person would be a big help if you are going to add sprinkles).

NOTE: Keep a bowl of ice water near your work station just in case you get some of this on your fingers (definitely not safe for younger kids).

NOTE: In the first stage of making the candy, try not to splash any liquid onto the sides of your pan (it can make crystals in the candy).

NOTE: I keep an electric frying pan, preheated to 200, at my work station. When the pan of candy comes off of the stove, I set it on the DRY, warm frying pan so that it doesn't cool down too fast and lengthens the amount of time you have to dip the apples.

NOTE: The best tip I can give you is to have EVERYTHING at your fingertips BEFORE you start dipping the apples. Once you are at that stage, you have zero time to run to the pantry and find something.

NOTE: Any candy left over can be poured out onto a pan that has been sprayed with cooking spray. When it's cooled, you can break it up and eat it (tastes like cherry life savers.

NOTE: There is a teaspoon of UNsweetened Kool Aid powder in each small envelope, so you can get two batches of candied apples per Kool Aid envelope (any flavor will work).

NOTE: Clean up can be a pain if you don't have a dishwasher. If you have a dishwasher, just put all of the stuff in the hot cycle.

NOTE: These are best eaten the day they are made. If you HAVE to make them a day ahead of time, do NOT cover them because the moisture from the apples will degrade the candy coating.

NOTE: Someone told me (I haven't tried it) that you can candy grapes, cherries and other small fruit (use their stems to hold onto instead of using a stick).

Tuesday, June 2, 2009

GREEN CHILI WON TONS with GUACAMOLE DIP

This has to be one of the easiest and fastest crowd pleasers I have ever made. It is a green chili and cheese wonton served with a guacamole dip. You can easily add more "heat" to the won tons and the cool, creamy guacomole accompanies it perfectly.
1 pound of Monterey Jack cheese (shredded)
(1) 4 ounce can of Ortega mild green chilies
1 package of won ton wrappers
2 Haas avocado's
1/4 cup favorite salsa
1 tablespoon cilantro chopped (optional)
2 tablespoons green onions (sliced thinly)
1/2 teaspoon salt
1 lime
1 tomato

Preheat oil in a deep-fryer. Combine shredded cheese and green chilies in a bowl; mix well. Put a won ton wrapper on your work surface. Wet your finger and run it along two inside edges of the wrapper. Place a teaspoon of the filling in the center of the wrapper and fold it over, pinching seams (you will have a triangle). Fold the corners (of the longest part of the triangle) back to the center and pinch it together (using a dab of water at the connecting point). See recipe photo. Deep fry these at about 350 degrees for about 30 seconds, or until nice and golden brown. Drain on paper towels.

Guacamole Dip
Roughly mash two avocado's with a fork. Add 1/4 cup of your favorite salsa, 1/2 teaspoon salt, 1 tablespoon chopped fresh cilantro (leave it out if your do not like cilantro), 2 tablespoons of thinly sliced green onions, the juice of 1 lime and a small chopped tomato. Stir gently and chill.

Tuesday, May 12, 2009

NO-BAKE BIRTHDAY CAKE

In a late night surfing episode, I found a recipe called éclair cake. It was not really a cake, but a combination of ready made ingredients that…together made an ooey gooey dessert that looked heavenly. I didn’t even write down the ingredients, I just sort of filed the idea away. Well, last weekend, I gave my version of it a try and it was, indeed, heavenly! It is three layers of graham crackers separated by two layers of vanilla pudding and topped with a fudge-y frosting. It is one of those recipes that tastes so much better on the second day, so if you plan on making this…keep that in mind and make it a day ahead. If you refrigerate it overnight, the graham crackers absorb a little moisture from the pudding and become “cake like”. This was so good that I made it for my own birthday!


(2) 3½ ounce instant French vanilla pudding
(1) pound of honey graham crackers
8 ounce Cool Whip thawed
3 cups of milk
6 tablespoons butter (melted)
6 tablespoons boiling water
6 tablespoons baking cocoa
2 cups powdered sugar
1 teaspoon vanilla


Place a single layer of graham crackers in the bottom of a 9x13 dish (breaking to fit if necessary). In a large bowl, whisk the instant pudding with 3 cups milk until well mixed, then fold in the Cool Whip. Immediately pour half of this mixture over the graham crackers (spreading evenly). Put another layer of graham crackers on top of the pudding and then another layer of pudding mixture. Top second layer of pudding with a final layer of graham crackers. Cover with plastic wrap and refrigerate for about an hour before you frost (to make it easier).

After an hour of chilling, mix melted butter, boiling water, cocoa and vanilla until well blended. Add powdered sugar and whisk until smooth. Immediately pour over chilled pudding dessert. Place dessert (uncovered) in fridge for an hour or so (until the frosting feels dry to the touch). When frosting is set (feels dry to the touch), stretch plastic wrap (tightly) over the pan so that it doesn’t touch the frosting. Refrigerate overnight.

NOTE: I use a glass 9x13 pan so that the plastic grips tightly and doesn’t sag down onto the frosting. Not necessary, but it looks prettier if the plastic doesn’t touch the frosting. A Tupperware 9x13 with snap-on lid works great too.
NOTE: I apologize to the blogger who originally posted this recipe. I tried to retrace my steps to find the submitter, however, my blog surfing obviously took me to pages I don’t recall. If this was your recipe, I apologize for not crediting you.
NOTE: The fudge-y frosting was not part of theoriginal recipe…that part of the recipe was my addition.

GIVE AWAY: The people at Stonyfield Farms sent me a bunch of coupons for free Oikos Organic Greek Yogurt. I would like to forward these to someone who would like to try this product. If you are interested in these coupons, just leave me a comment telling me why. I'll post the winners name Wednesday morning.

Saturday, May 9, 2009

CHICKEN FINGERS

Chicken Fingers are an excellent appetizer for parties (for all age groups). It is also a quick “go to” meal for a weeknight dinner. Simple and delicious, what more can you ask for? If you have any leftovers, this chicken (chopped up) makes a fantastic chicken & grilled cheese sandwich on day two.
6 boneless, skinless chicken breast halves
2 cup of buttermilk
1 teaspoon garlic powder
2 cups flour
2 eggs, beaten
1 teaspoon salt
½ teaspoon black pepper
½ teaspoon onion powder


Combine the buttermilk, beaten egg and garlic powder and pour it into a large Ziploc bag. Cut the chicken breast into long half inch wide strips and put them in the same Ziploc bag. Refrigerate this until you are ready to cook (or at least 2 hours). In another large Ziploc bag, combine the flour, salt, pepper and onion powder.

When it is time to cook, follow these steps:
1. Drain chicken (saving liquid) and coat chicken in flour mixture.
2. Shake off excess flour mixture and put BACK INTO liquid again.
3. Repeat step one, then THROW AWAY BUTTERMILK LIQUID
Fry chicken fingers in ½” vegetable oil until golden. Keep warm in oven.
photo

BARBEQUE DIPPING SAUCE
1 cup ketchup
¼ cup white vinegar
½ cup brown sugar
2 tablespoons chopped onion (sautéed)
1 teaspoon Worcestershire sauce
½ teaspoon liquid smoke
¼ teaspoon black pepper
¼ teaspoon celery salt
½ teaspoon powdered mustard
Combine and simmer slowly for about 10 minutes.


We like barbeque flavored Chicken Fingers. To do that, I simply put one half cup of barbeque into a large frying pan, let it heat up. Then I put the cooked chicken fingers in the sauce and toss lightly.

NOTE: Personally, we like this recipe best with boneless, skinless chicken thighs because they are so moist. This is also excellent with chicken tenderloin pieces.

Search This Blog

Popular Posts

Like This

 
Copyright © 2011. Area Information: PARTY SNACKS . All Rights Reserved
Company Info | Contact Us | Privacy policy | Term of use | Widget | Advertise with Us | Site map
Template modify by Creating Website. Inspired from CBS News