Showing posts with label NO BAKE DESSERTS. Show all posts

Thursday, January 19, 2012

PEANUT BUTTER KRISPIE TREATS

This recipe has been around forever; it is one of those classic sweet treats from our childhood.  Picky-picky husband is a big fan of the old fashioned Rice Krispie treats made with melted marshmallows, so he initially resisted this peanut butter version (he resists change).  However, this evening, I noticed that the pan of treats, on the kitchen counter, had been seriously noshed upon.
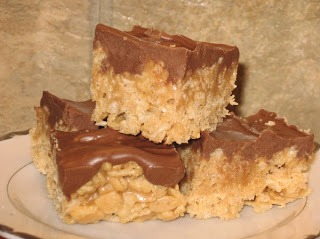
This recipe is SUPER easy and uses all pantry ingredients, which is a good thing.  It goes together in just minutes (the longest part of this recipe is the cool down time). They cut beautifully if you let them cool all the way down and they travel well.

1 cup light Karo syrup
1 cup granulated sugar
1 cup peanut butter
6 cups Rice Krispie cereal
1 cup semi-sweet chocolate chips
1 cup peanut butter chips (see note)

Mix the syrup and granulated sugar in a heavy saucepan, over medium heat (stirring). Bring to a boil and immediately remove from heat; stir in peanut butter until smooth and well mixed.

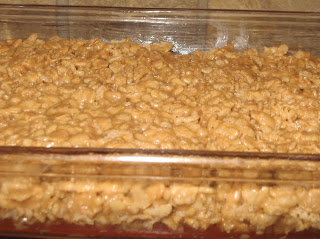
Pour over Rice Krispie cereal and stir to coat evenly.  Press into a lightly greased 11" x 7" pan (see note) and press down evenly with slightly damp hands.
Melt the chocolate chips and stir until smooth (I melted mine in my microwave at 60% power for about 1½ minutes).  Spread evenly over bars.  Cool about an hour before cutting.
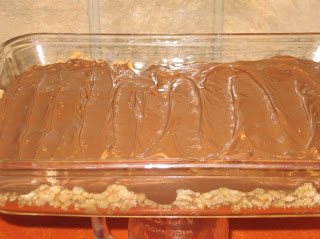
NOTE: This recipe calls for half semi-sweet chocolate chips and half peanut butter chips, but any combo would work well.  I found a similar recipe that used half semi-sweet chocolate chips and half butterscotch chips for the frosting (they called them Scotcheroo's).
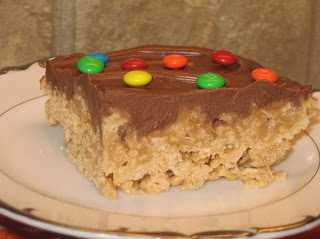
NOTE: The size of the pan is not really important. Just remember that the smaller the pan is, the thicker the treats will be and the bigger the pan is the thinner they will be.

Tuesday, January 10, 2012

CHOCOLATE SILK PIE

Have you ever had a cream pie dessert that, was (not only) outrageously delicious, but the "mouth feel" was absolutely sublime? That perfectly describes this chocolate silk pie; it is the smoothest, creamiest chocolate filling we have ever eaten !!

Sorry about not having a photo of the final decorated pie.


CRUST   (see note below)

1¼ cups flour
1/2 cup finely chopped nuts (use food processor)
1/4 cup brown sugar
1/2 cup butter

Combine the flour, finely chopped nuts and brown sugar; cut in the butter until  you get a crumb mixture. Make sure you don't press it into a ball = let it stay loose.  Spread the crumbs out on a cookie sheet and bake at 375 for about 12 minutes, or until they crisp up (stir them a couple of times while baking).  Cool for about 15 minutes, then press them on the bottom and up the sides of a 9" spring form pan.  Set aside.

FILLING

2 cups semisweet chocolate chips
2 cups heavy whipping cream (divided)
2 tablespoons powdered sugar
2 teaspoons vanilla
8 ounces cream cheese (room temperature)

In a small microwave bowl, mix the chocolate chips and 1/2 cup of the cream. Heat on 50% power for about 2 minutes, then stir. If they aren't completely melted and smooth, continue microwaving on 50% power (30 seconds at a time), stirring each time.  My microwave oven took the initial 2 minutes plus about 20 more seconds. COOL MELTED CHOCOLATE FOR 20 MINUTES BEFORE USING!!

In a different bowl, mix the remaining 1½ cups of whipping cream, powdered sugar and vanilla. Beat on high until stiff peaks form, set aside.

In another large bowl, beat the cream cheese until fluffy, gradually mix in the melted chocolate mixture, beating until very smooth.  Gently fold in the whipped cream with a rubber spatula. Do this slowly so you don't deflate the air in the whipped cream..

Fill the pie crust with the filling, smooth the top and chill at least 4 to 6 hours (better overnight).

CRUST NOTE:  This crust was very tasty, but I don't think it was worth the extra effort.  I believe a graham cracker crust would be even better.  The next time I make this for a holiday, I have plans to use some of those tiny pre-made phyllo dough cups and just put the filling in those. I think they would be so festive and my family has really enjoyed the single serving desserts lately.

Monday, August 29, 2011

PINEAPPLE COCONUT CREAM PIE

I found this quick and easy pie recipe over at Sweet as Sugar Cookies the other day. Lisa hosts a Saturday blog that is FULL of great dessert recipes. If you haven't checked it out, please do so, it is lots of fun.

Lisa posted this as a pineapple cream pie, but I added half cup of coconut to the pudding and topped it with stabilized whipped cream. It was quick, easy and delicious!!!
The pudding is nearly fool proof!!

½ cup white sugar
½ teaspoon salt
3 tablespoons cornstarch
1 tablespoon all purpose flour
2½ whole milk
3 egg yolks

Put all of the above ingredients into a heavy bottomed pan and whisk it until any lumps are gone. Bring to a boil over medium heat, stirring constantly with rubber spatula.  Once the pudding starts to thicken, switch to a whisk and whisk, while it boils, for one minute (it will get very thick).

Remove from heat and stir in:
1 tablespoon butter
1 teaspoon vanilla (I used 2 teaspoons)
1 cup canned crushed pineapple (I drained it and squeezed it dry)
½ cup flaked coconut (my addition)


Pour into 9" graham cracker pie shell and place plastic wrap on the surface of the hot pudding. Chill for several hours, then remove plastic and top with stabilized whipped cream.

Stabilized Whipped Cream (won't deflate)  Makes 2 cups
1 cup heavy whipping cream
¼ cup powdered sugar
1 teaspoon vanilla extract
1 teaspoon unflavored gelatin powder
4 teaspoons cold water

Put unflavored gelatin powder in a small dish and add 4 teaspoons of cold water and stir. Let this sit until it looks semi-solid, then put this in the microwave for just a couple seconds (my microwave takes about 3 or 4 seconds) and it will turn back to a liquid.  Let this liquid cool, but not so cool that it turns back into a solid.
Whip the cream, sugar and vanilla until it gets thick, but  not totally whipped.  While the beaters are still going on high, dribble in the cooled liquid gelatin. Continue beating until stiff peaks form.

NOTE: A 20 ounce can of crushed pineapple (drained and squeezed dry) gives you about 1½ cups of fruit.
NOTE: This pie slices beautifully.

Monday, March 28, 2011

STRAWBERRY CHANTILLY

Sweet, light as air, packed with strawberry puree and waiting in the freezer for that special occasion!!

 CRUST
1 cup all purpose flour
¼ cup brown sugar
½ cup butter
½ cup chopped pecans

Cut the butter into the flour & sugar until crumbly, then stir in the chopped pecans. Press into a 9" x 13" baking dish and bake at 300 for 20 minutes. Set aside to cool completely. NOTE: I make this dessert with a spring form pan (it looks prettier). I just bake the crust a few extra minutes.

FILLING
2 egg whites
1 cup granulated sugar
2 cups sliced strawberries
1 cup heavy whipping cream
1 teaspoon lemon juice

Pulse the strawberries a couple of times in a food processor to chop them finely. Add the egg whites, sugar and lemon juice to the strawberries. Beat with electric mixer on high for ten minutes. This will really expand, so use a BIG bowl (it fills my kitchen aid bowl). In a different bowl, beat the heavy whipping cream until you get stiff peaks. Gently fold it into the strawberry meringue mixture. Pour into baked-cooled crust and cover well. Freeze for at least 6 hours, preferably overnight. This is OH SO GOOD!!!

I made mine in a 9" x 3" spring form pan and it filled it to the top. Make sure you freeze it overnight. The person I got this recipe from said that she had to take it out of the freezer 15 minutes early for easy slicing, but mine sliced PERFECTLY directly out of the freezer (and it had been in the freezer for 24 hours!).

Friday, April 23, 2010

Strawberry Mousse by Paula Deen

If it is a real Paula Deen recipe, you know it is going to be rich, delicious and decadent. This little recipe certainly fits all three categories. It is quick to fix and it has many possibilities. This time, I served it in little dessert glasses. Next time, I plan on using a 9" x 13" pan (yes, it makes a lot) and stirring in a few chopped strawberries and putting it all on a graham cracker crust. This would be a huge hit at any family gathering or pot luck.

1 envelope unflavored gelatin
¼ cup hot water
3 cups heavy whipping cream
1/3 cup powdered sugar
¾ cup Smuckers strawberry-flavored syrup
.
In a small bowl, dissolve the gelatin in very hot water; let stand for 10 minutes or until room temperature.
.
In a large bowl, beat cream at medium-high speed with an electric mixer, until soft peaks form. Gradually add the powdered sugar, beating until stiff peaks form. Whisk in the gelatin and strawberry syrup. Cover and chill for at least 4 hours.
.
NOTE: This makes a lot (at least 8 pretty good sized dessert dishes.
NOTE: I think this would be very good frozen as well.
NOTE: Because this has gelatin in it, it keeps very well in the fridge for several days.
NOTE: I'm sure other flavored syrups would work well in this recipe as well, blueberry sounds pretty good.
NOTE: If you lick the beaters right after you stir in the syrup, this dessert is going to taste like it is lacking something...no fear. After the 4 hours, the strawberry syrup mellows and the dessert is very tasty.

Thursday, January 14, 2010

LEMON MERINGUE BITES

I am a new convert for the little pre-made phyllo cups made by Athens (found in the frozen foods section). I have found many sweet and savory uses for the little time savers.

These sweet little beauties went together in (literally) minutes, thanks to the phyllo cups.
This filling recipe will fill two packages of phyllo cups and since they are so small, they chill quickly and will be ready to serve in short order. Two packages sounds like a lot of lemon pies, but it really isn't (the filling recipe was originally for an 8" pie). Hubby ate four of these after a big meal, so keep that in mind.
2 packages of phyllo cups

LEMON FILLING
1 cup white sugar
¼ cup corn starch
1 cup water
2 egg yolks, slightly beaten
2 tablespoons butter
1/3 cup fresh lemon juice
½ teaspoon fresh lemon zest
2 drops yellow food color (optional)

MERINGUE TOPPING
2 egg whites
¼ teaspoon cream of tartar
¼ cup white sugar
½ teaspoon vanilla extract

For filling, mix sugar, cornstarch and water in a heavy bottomed sauce pan. Cook over medium heat, stirring constantly, until mixture thickens and comes to a boil; boil and stir for one minute. Stir half of this mixture into the beaten egg yolks (whisking like crazy to keep the mixture moving). After well mixed, pour the whole thing back into the original pan and boil (and stir) for one more minute. Remove from heat and stir in the lemon juice, lemon zest and butter. Spoon hot lemon mixture into phyllo cups.
For the meringue topping, beat (with electric mixer) the egg whites and cream of tartar until foamy then sprinkle in the sugar, a little at a time, while you are beating; add the vanilla and continue to beat until stiff peaks form when you lift the beaters out of the bowl.
Top the hot lemon filling with a spoonful of meringue. Bake in a 400F oven for about 10 minutes or until the meringue becomes golden and shiny (watch carefully). Cool on the counter until they are room temperature THEN put them in the fridge to chill. NOTE: Be careful when you separate the eggs; even just a speck of yolk in the egg whites will stop them from whipping correctly. Also, make sure you do NOT whip the egg whites in anything plastic. Any traces of grease or oil in the bowl or on the beaters will stop your egg whites from whipping properly.
Thank you all for your well wishes, regarding our cat Tabitha. She is walking around today and even has found her kitty voice again!! Thanks to lots of "ear licks" from our dog Chloe, Tabitha is well on her way to a full recovery.

Friday, November 20, 2009

PEANUT BUTTER CHOCOLATE DESSERT - WITH AWARD WINNING WHIPPED CREAM (and a question)

I found the recipe for this luscious peanut butter-chocolate dessert over at A Blog About Food. Teresa warned that the pie was "pure evil" because it kept beckoning to her and she couldn't leave it alone and she was right!! Evil aside, it would make a fantastic addition to ANY holiday table. It has an Oreo cookie crust, a peanut butter-cream cheese layer and then a chocolate pudding layer. It is definitely "over the top" scrumptious. Thanks for sharing the recipe Teresa.

The whipped cream on this dessert is my own tweak. It is a cream cheese-whipped cream that is completely stable (it does NOT deflate). If you look at the second photo, you can see how well it pipes and, amazingly enough, it stays that way for days (in the fridge)!!

PEANUT BUTTER CHOCOLATE DESSERT
20 Oreos, divided
2 tablespoons butter, softened
(1) 8 ounce package cream cheese, room temperature
½ cup peanut butter
1½ cups powdered sugar, divided
(1) 16 ounce carton whipped topping, divided
15 mini peanut butter cups, chopped
1 cup cold milk
(1) 3.9 ounce instant chocolate fudge pudding mix

Crush 16 of the cookies in food processor, add melted butter and press into the bottom of an Ungreased 9” square dish (I used a 9” round spring form pan).

In large mixing bowl, beat cream cheese, peanut butter and one cup of the powdered sugar until smooth. Fold in HALF of the whipped topping and spread over the Oreo crust. Sprinkle with peanut butter cups (chop them pretty small).

In another mixing bowl, beat the milk, pudding mix and remaining powdered sugar on low for two minutes then fold in the remaining whipped topping. Spread over the peanut butter layer. Crush the remaining 4 Oreo cookies and sprinkle over the top. Cover and chill for at least three hours.

NOTE: I removed the frosting layer from the Oreos and then processed them into very fine crumbs.


STABLE WHIPPED CREAM
(1) 8 ounce package cream cheese, room temperature
½ cup white sugar
1 teaspoon vanilla extract
½ teaspoon almond extract (optional)
2 cups heavy whipping cream

Combine the cream cheese, sugar and extracts in a large mixing bowl until very smooth (scrape the sides of the bowl often). While the mixer is still running, slowly pour in the heavy cream. Continue beating on high speed until very stiff peaks form.

NOTE: I left out the almond extract for this chocolate dessert, however, if you are using this whipped cream for anything but chocolate, the almond extract is a nice addition.

NOTE: Make sure you stop and scrape the bowl sides down while you are whipping the cream. This next photo is a close up to show you how well this whipped cream "behaves" in a piping bag.
This is what the dessert looks like inside

QUESTION: What's on your Thanksgiving menu this year (from soup to dessert)??

Friday, October 2, 2009

CHOCOLATE-PEANUT BUTTER MOUSSE PIE

A graham cracker & chopped peanut crust, covered with a rich chocolate ganache layer, then topped with a layer of sweet, creamy, peanut butter mousse. Does it get any better than that? This no-bake pie is easy to make and totally satisfying!!


1 cup graham cracker crumbs
1/3 cup honey-roasted peanuts finely chopped
6 tablespoons butter (room temperature)
1½ cups whipping cream (divided)
(1) 14 ounce can of sweetened condensed milk (not evaporated)
1½ cups semisweet chocolate chips
(2) 3 ounce cream cheese (room temperature)
¾ cup creamy peanut butter

Mix graham cracker crumbs, chopped peanuts and melted butter. Spread on the bottom and up the sides of an ungreased 9" pie plate (set aside).

Microwave one half cup of whipping cream for 2 minutes (on high). Stir in one half cup of sweetened condensed milk and the chocolate chips. Stir until very smooth. Pour evenly over graham cracker crust bottom and chill for an hour (I put mine in the freezer for 20 minutes).

In a medium size bowl, beat the cream cheese until it is smooth. Beat in the remaining sweetened condensed milk and the peanut butter. Whip until this mixture is very smooth (it will be thick). In a large bowl, whip the remaining one cup of whipping cream until stiff peaks form. Fold in the cream cheese-peanut butter mixture (by hand). Keep folding gently until everything is well blended together. Spoon over the chilled chocolate layer. Chill for about 4 hours or overnight.

NOTE: This would be very good with a chocolate graham cracker crust as well.
NOTE: This would be a great dessert for the holidays. I picture it in small, individual dessert dishes.

Wednesday, August 12, 2009

NO BAKE LEMON CHEESECAKE WITH BLUEBERRY SAUCE

A light and sweet ending to a summer barbecue. This no bake "cheese cake" recipe can be whipped up in a hurry. You can double the recipe and put it into a large sheet pan (for a big crowd). My husband likes to eat this frozen.


CRUST
1/2 cup melted butter
1/4 cup white sugar
2 cups graham cracker crumbs
Mix crust ingredients and press onto the bottom of a 9x13 baking pan. Bake at 325 for about 8 minutes. Cool before filling.

FILLING
Large size Cool Whip
1 small box of lemon jello
1 cup of boiling water
1 cup white sugar
8 ounce cream cheese (room temperature)
2 teaspoons vanilla
1/4 teaspoon lemon extract

Dissolve the lemon jello in the boiling water and let it cool to room temperature (don't let it set up).

Beat the cream cheese, white sugar and both extracts together until creamy and smooth. Beat the cooled jello and the cream cheese mixture into the Cool Whip until it is very well mixed. Pour onto the cooled crust and chill at least 2 hours.

BLUEBERRY SAUCE
2 cups fresh blueberries
1/2 cup white sugar
2 tablespoons cornstarch
1/3 cup water
1/2 teaspoon vanilla extract

Mix the sugar and cornstarch in a medium size sauce pan and gradually add the water (whisking to mix). Stir in blueberries and bring to a simmer. Simmer until it thickens then simmer one minute longer. Stir in the vanilla. Serve warm or cold.

Monday, June 22, 2009

NO-BAKE CHOCOLATE CHEESECAKE

I made this for Father's Day. It is one of those recipes that is super quick to put together, looks and serves beautifully and everyone raves about it. It is super creamy, chocolate-y, ultra-smooth to the tongue and it has a chocolate chip cookie crust, what more can a person ask for?
This recipe makes a nice thick cheesecake that is pretty enough for company!

(1) 16 & 1/2 ounce pkg. refrigerated chocolate chip cookie dough (or 2 cups of home made chocolate chip cookie dough) at room temperature.
(2) 8 ounce packages of cream cheese (room temperature)
(1) cup of white sugar
(4) one ounce packets of Nestle Toll House pre-melted chocolate (see note)
(2) 8 ounce containers of Cool Whip (thawed)

For the crust:
Preheat your oven to 375. Evenly spread the cookie dough into an ungreased 9" spring form pan (2 piece pan). Bake for 15 minutes or until lightly golden. Let this cool completely (leave it in the pan ).

For the filling:
With an electric mixer, beat the cream cheese, sugar and pre-melted chocolate until very well blended. Beat in the two containers of Cool Whip until you see an even color throughout the filling. Spoon the filling into the cooled crust. Cover and refrigerate for at least 4 hours.

Frosting:
This does not have to be frosted, but it is pretty with either a drizzled frosting or a simple chocolate glaze & sprinkles.

NOTE: This recipe calls for Nestle Toll House Choco Bake which is a pre-melted chocolate. It comes in a box of eight, one ounce packets. I found it at Walmart, of all places, right with the other baking chocolate.
NOTE: Make sure the cookie dough and cream cheese are at room temperature.

Monday, May 25, 2009

FUDGESICLES (and some questions for you)

With warm weather approaching and kids already out of school, it is time for kid friendly recipes. These fudgesicles are not only tasty, but they are inexpensive to make using every day ingredients from your pantry. If you do not have Popsicle molds, just use 3 ounce waxed paper (bathroom) cups and popsicle sticks.

In heavy bottom, medium size saucepan, mix:
3 cups milk
¼ cup cornstarch
1/8 teaspoon salt
½ cup corn syrup (light)
1 teaspoon vanilla

Bring to gentle boil on medium high and boil 1 minute (make sure you stir constantly). Remove from heat and add 1 cup of milk chocolate chips, stir to melt.

Pour into Popsicle molds (or 3 ounce waxed paper cups). Freeze overnight.
NOTE: About an hour or so after you put the paper cups into the freezer, insert a Popsicle stick in the center, and return to freezer.

Tuesday, May 12, 2009

NO-BAKE BIRTHDAY CAKE

In a late night surfing episode, I found a recipe called éclair cake. It was not really a cake, but a combination of ready made ingredients that…together made an ooey gooey dessert that looked heavenly. I didn’t even write down the ingredients, I just sort of filed the idea away. Well, last weekend, I gave my version of it a try and it was, indeed, heavenly! It is three layers of graham crackers separated by two layers of vanilla pudding and topped with a fudge-y frosting. It is one of those recipes that tastes so much better on the second day, so if you plan on making this…keep that in mind and make it a day ahead. If you refrigerate it overnight, the graham crackers absorb a little moisture from the pudding and become “cake like”. This was so good that I made it for my own birthday!


(2) 3½ ounce instant French vanilla pudding
(1) pound of honey graham crackers
8 ounce Cool Whip thawed
3 cups of milk
6 tablespoons butter (melted)
6 tablespoons boiling water
6 tablespoons baking cocoa
2 cups powdered sugar
1 teaspoon vanilla


Place a single layer of graham crackers in the bottom of a 9x13 dish (breaking to fit if necessary). In a large bowl, whisk the instant pudding with 3 cups milk until well mixed, then fold in the Cool Whip. Immediately pour half of this mixture over the graham crackers (spreading evenly). Put another layer of graham crackers on top of the pudding and then another layer of pudding mixture. Top second layer of pudding with a final layer of graham crackers. Cover with plastic wrap and refrigerate for about an hour before you frost (to make it easier).

After an hour of chilling, mix melted butter, boiling water, cocoa and vanilla until well blended. Add powdered sugar and whisk until smooth. Immediately pour over chilled pudding dessert. Place dessert (uncovered) in fridge for an hour or so (until the frosting feels dry to the touch). When frosting is set (feels dry to the touch), stretch plastic wrap (tightly) over the pan so that it doesn’t touch the frosting. Refrigerate overnight.

NOTE: I use a glass 9x13 pan so that the plastic grips tightly and doesn’t sag down onto the frosting. Not necessary, but it looks prettier if the plastic doesn’t touch the frosting. A Tupperware 9x13 with snap-on lid works great too.
NOTE: I apologize to the blogger who originally posted this recipe. I tried to retrace my steps to find the submitter, however, my blog surfing obviously took me to pages I don’t recall. If this was your recipe, I apologize for not crediting you.
NOTE: The fudge-y frosting was not part of theoriginal recipe…that part of the recipe was my addition.

GIVE AWAY: The people at Stonyfield Farms sent me a bunch of coupons for free Oikos Organic Greek Yogurt. I would like to forward these to someone who would like to try this product. If you are interested in these coupons, just leave me a comment telling me why. I'll post the winners name Wednesday morning.

Search This Blog

Popular Posts

Like This

 
Copyright © 2011. Area Information: NO BAKE DESSERTS . All Rights Reserved
Company Info | Contact Us | Privacy policy | Term of use | Widget | Advertise with Us | Site map
Template modify by Creating Website. Inspired from CBS News