Showing posts with label CROCKPOT RECIPES. Show all posts

Friday, January 27, 2012

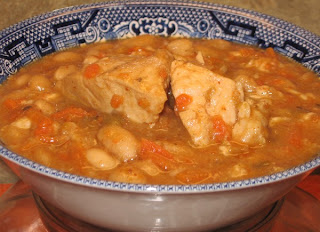
CROCKPOT CHICKEN CHILI

This is a new recipe experiment for us and I must tell you it was delightful. It is one of those rare meals that is not only good for you, but it's very tasty, very hearty and it rings all the familiar bells of comfort food.

This recipe is also a breeze to make because you put most of the ingredients in the crockpot the night BEFORE you want to serve it (no need to pre-soak the beans) and then in the morning, you just add the chicken and carrots and let it cook all day!! It will make your house smell fantastic!!
1½ cups DRY Great Northern white beans (rinsed)
4 boneless skinless chicken breasts
1 cup chopped onion (sauteed)
4 ounce can mild green chile's
2 cups grated carrots
3 teaspoons chili powder
1 teaspoon ground cumin
½ teaspoon dry oregano leaves
1/8 teaspoon cayenne pepper (or to taste)
1 teaspoon salt  (see note below)
½ teaspoon black pepper
6 cups chicken stock (see note below)
1 cup Monterrey Jack Cheese shredded

Wash and sort the dry beans (do not pre-soak) and put them in the crockpot. Add the stock, sauteed onion, seasonings and chile's. Cook on LOW setting overnight (or about 8 hours).

In the morning, remove about a cup of the beans and mash them thoroughly. (I put them in the blender)  Return the mashed beans to the crockpot; this will thicken up the broth in the chili.

Cut the raw chicken into large pieces and add it to the crockpot along with the shredded carrots.  Cook this on high for 6 to 8 hours. If your crockpot runs very hot (as some of them do) cook it on low instead.

About 30 minutes before you want to serve the chicken chili, add the shredded Monterrey Jack cheese and stir.
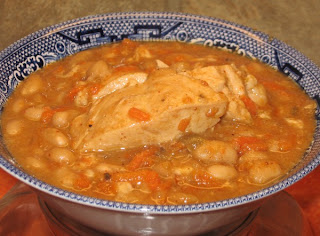
I hope you like this hearty "good for you" chili as much as we did.

NOTE: If you use salt free chicken broth, go ahead and put the teaspoon of salt into the chili. Taste it again after it is finished cooking (and you've added the cheese) to see if it still needs more salt.   If you use chicken broth made from bullion, I wouldn't add any salt to the recipe, as the bullion broth is already quite salty.

NOTE: I hope you don't leave out the grated carrot, it really adds a wonderful taste and texture to the chili.

NOTE: We are fairly timid when it comes to spicy heat in our food. The recipe calls for 1/8 teaspoon of cayenne pepper. I used a scant 1/8 teaspoon and it was absolutely perfect for us. If you like more heat in your food, add more cayenne.

Wednesday, January 11, 2012

SPAGHETTI

On snowy winter days, when it is good to stay close to home, I enjoy making dinner in the slow cooker. One of our favorite's is spaghetti; our kids were raised on this recipe and it is one of picky-picky husbands favorites.

The thick and hearty sauce and tender meatballs really need a solid six hours or more in the slow cooker, so don't be tempted to rush this recipe. I love the way my kitchen smells when I make this sauce.


MEATBALLS
1 pound of lean (90% or better) ground beef
1/2 cup fine dry bread crumbs
1 egg
1 teaspoon salt
1/4 teaspoon black pepper
Mix all of the meatball ingredients and shape into walnut size meatballs. Bake in a 350 oven for 15 minutes then drain well before adding to sauce.

 
SPAGHETTI SAUCE
(1) 14 ounce can of tomato sauce
(1) 12 ounce can of tomato paste
4 cups water
1/2 cup chopped onion
1 cup finely diced carrot
1 clove of minced garlic
1 tablespoon olive oil
2 teaspoons dried sweet basil
1 teaspoon dried oregano
1/2 teaspoon fennel seed
1 teaspoon salt
1/2 teaspoon black pepper
1 tablespoon sugar

Saute the onions, garlic and carrots in the olive oil until they are very aromatic (they don't need to be cooked through). Add the rest of the sauce ingredients and bring to a boil.  Put EVERYTHING in the slow cooker and add the baked meatballs. Cook on high for 6 hours.

The last couple of hours, leave the slow cooker lid open just a crack so the sauce will reduce and thicken. Serve over spaghetti noodles.

NOTE: If you like mushrooms, add them the last hour of cooking.


NOTE: No matter how hard I try to make a "smaller" batch of spaghetti sauce, it always ends up making too much, so now I plan on it. The sauce that we don't use on night one, goes into a lasagna casserole for the freezer. Some sauces just need to be cooked in big batches I guess.

Tuesday, June 21, 2011

CROCKPOT LASAGNA

SERIOUS COMFORT FOOD

I guess this isn't technically lasagna, since it is cooked in the crock pot and uses rigatoni noodles, but it qualifies as serious comfort food and has all of the rich, familiar lasagna flavors.

1½ pounds lean ground beef (browned & drained well)
4 cups of beef broth (not bullion)
(1) 15 ounce can of tomato sauce
(1) 12 ounce can of tomato paste
1 tablespoon dehydrated onion flakes
1 teaspoon dry oregano
2 teaspoons dry basil
½ teaspoon fennel seed (don't leave out)
2 teaspoons salt
1 tablespoons sugar (don't leave out)
½ teaspoon black pepper
small pinch of red chili flakes (optional)
¾ pound of rigatoni noodles
½ pound of mushrooms (thick sliced)
2 to 3 cups Colby jack cheese shredded
1 cup of ricotta cheese

Brown the ground beef and drain it very well. In a large crock pot (see note below), Mix the beef broth, tomato sauce, tomato paste, onion and spices. Use a whisk to mix the sauce together well, then stir in the meat and mushrooms. Cook on high for 4 hours (see note). Stir once in a while during the 4 hours if possible (but not absolutely necessary.

After 4 hours, Stir in the DRY unboiled rigatoni, make sure you push them under the sauce (add a little extra hot water if necessary). Add the ricotta to the crock pot by spooning tablespoons of it in random spots and gently push down on the ricotta to submerge it as well (don't stir).

Continue to cook on low for 30 more minutes. Sprinkle the surface with shredded Colby jack cheese and put the lid back on for about 5 minutes or until cheese is nicely melted. Serve.

NOTE: My crock pot is a large oval and wide slow cooker, which works well for this recipe, as opposed to a small/tall one.  The main cooking time is 4 hours on high, but if you are going to be away from the house all day, just turn it down to LOW and cook for 8 hours before you add the noodles. If you are using one of those smaller/taller slow cookers, you may have to adjust the cooking time a little.

NOTE: My crock pot has a "low" setting, a "high" setting and a "warm" setting. Once this recipe is completely done (and ready to eat) you can leave it on "warm" for quite a while. Warning, "low" is not the same as "warm".

NOTE: Noodles tends to fall apart if you leave them in the crock pot for much more than 30 minutes, so don't be tempted to add them early. Thirty minutes is perfect.

NOTE: This recipe uses rigatoni noodles, which are large diameter tubular noodles that have ridges on them. However, any kind of thick walled (sturdy) noodle will work for this recipe. Just make sure you do NOT BOIL THEM before you add them to the sauce. They cook in the sauce and soak up all of that extra liquid. Regular elbow noodles work well if you are serving this to a crowd of kids.

NOTE: I like dehydrated onion in this recipe, but if you don't have that, just saute a small chopped onion along with the ground beef.

NOTE: You can use your favorite cheese. We happen to like Colby jack cheese, but mozzarella works well too.

NOTE: This reheats very well.

Sunday, September 26, 2010

CROCK POT PORK AND APPLES

A few months ago, I tried Katy's recipe for "Simply Great Chicken" at Food for a Hungry Soul. The sauce was excellent, so I decided to try it with pork. The inspiration for today's post comes from that recipe with a nod to my cooking buddy Katy!!
2 pound LEAN pork roast
½ cup brown sugar
.7 ounce DRY Good Seasons Italian dressing
¼ teaspoon black pepper
pinch of red pepper flakes (or to taste)
2 large granny smith apples

Trim the roast of all big fat. I used a 2 pound sirloin pork roast that was ultra-lean. Cut it into 2" cubes. Peel and core the apples and cut them into large chunks. Toss everything together well and place in a crock pot that you have sprayed with vegetable spray.

Cook on low for 5 to 6 hours, depending on how large your meat cubes are. Stir the meat and sauce a few times during the cooking time.

After the mixture has cooked for about 4 hours, the apples will start to break down and turn into something like an applesauce-gravy. Sounds strange, but it is delicious. Pork is done when it is fork tender. Serve over rice.

NOTE: If you use more than a two pound pork roast, add enough apples to equal one large apple per pound of pork.

NOTE: The .7 ounce packet of DRY Good Seasons brand Italian salad dressing comes in several varieties. Make sure you use the "regular style" one. Mix the dry powder with the brown sugar and spices.

Sunday, January 24, 2010

CROCKPOT SWISS STEAK

Super easy, super flavorful, super leftovers...what more can I say? This is comfort food at its best. For the richest flavor, brown the meat and veggies before they go into the crockpot, but that isn't absolutely necessary if you are in a rush. This recipe will fill your kitchen with nostalgic aromas from your childhood and leftovers make the best panini sandwiches for tomorrow nights dinner.


¼ cup all purpose flour
1 teaspoon salt
½ teaspoon black pepper
2 teaspoons dry basil leaves
2 pounds round steak (about ¾" thick) see note
3 tablespoons vegetable oil
3 stalks celery chopped (see note)
small chopped onion
3 carrots chopped (see note)
(2) 14.5 ounce cans diced tomatoes (see note)
1 tablespoon Worcestershire sauce
2 tablespoons brown sugar
.
Cut the meat into serving size pieces and coat it with the flour (save any flour that doesn't stick to the meat). Brown the meat in the vegetable oil then put it into the crockpot. In the same pan, saute the onion, celery and carrot until tender. Stir in the diced tomatoes, salt & pepper, basil, Worcestershire, brown sugar and the rest of the flour. Mix well and pour over the meat in the crockpot. Cover and cook on low for 8 hours or until the meat is very tender (my crockpot cooks hot, so it was tender in 6 hours); the sauce/gravy thickens as it cooks.
.
NOTE: The recipe calls for round steak, but I thought that would taste a little dry because its so lean, so I used lean chuck steak and trimmed all the fat away.
.
NOTE: I chopped the veggies in the food processor to get them small enough. I also used canned diced tomatoes that had basil and oregano in them and I put the tomatoes in the food processor because Hubby doesn't like to "see" chunks of tomatoes in the sauce.
.
NOTE: If you like mushrooms, add them the last half hour of cooking, or serve them on the side.

Thursday, October 22, 2009

Dulce de Leche -- The Easiest Method Ever!!

I am fairly new to dulce de leche; I just know I want to bake with this deliciously thick, creamy caramel for the holidays AND that it is expensive. I received a lot of replies to my post asking you if you knew anything about making dulce de leche. One response, from Pam H., has made me a very happy camper!! She sent me a link to A Year of Slow Cooking. There, they had a "recipe" for making this stuff in your crockpot!!! Yes, you heard me right, the crockpot!! I was very skeptical, but last night, I put it to the test and let me tell you it works like a dream!!! Thank you so much to Pam H. for sending me the link.

I must start out this post by telling you that the people that make Eagle Brand Sweetened Condensed Milk never anticipated people heating their product in an unopened can. As a matter of fact, I'm sure they would disapprove, so please, if you try this method, use common sense caution. I am a little concerned that some of you are talking about boiling an unopened can in a pot of water. I CAN NOT RECOMMEND THAT BECAUSE I HAVEN'T TRIED IT. It may be very safe, it may not, I just don't know. I would hate to have the can blow up on you. Some web sites recommended cooking it in a pressure cooker, so the cans must be pretty tough. All I know is that the low & even heat of the crockpot for 8 hours worked extremely well for me.

All you do is place the UNOPENED can of sweetened condensed milk in your crockpot and fill the crockpot with water, making sure that the water is at least 2" above the top of the can. Put the lid on and cook on LOW for 8 hours...that's it!!! Take the can out of the hot water carefully, and let it cool for at least a couple hours before you open it. If you aren't going to use it right away, don't even open the can, just label it and put it back on the shelf!! It could not be easier. This is what it looked when I opened the can:

Crockpot Dulce de Leche

Monday, October 19, 2009

CROCKPOT MAPLE PORK TENDERLOIN

This recipe gets five stars for two reasons...it is totally delicious AND super simple. As a matter of fact, it is one of the best crockpot recipes that I've tried in a long time. You can not get much simpler than this: brown the pork loin, cover it with sauce and 8 hours later (my crockpot only took 6 hours) and you have fork-tender, delicious pork loin and a gravy that is amazing.

2½ pound boneless pork loin
1 cup real maple syrup (DON'T USE PANCAKE SYRUP)
4 tablespoons Dijon mustard
2½ tablespoons cider vinegar
2½ tablespoons soy sauce
salt and pepper

I bought my pork loin, vacuum packed from Walmart (2½ pounds seems to be a standard size). When you open the package, there will be two long loin pieces. I cut each one into three pieces, then salted and peppered them and browned them in a little olive oil. Place the browned pieces in a wide crockpot for even cooking (as opposed to the tall ones).

In a small bowl, whisk the maple syrup (do not use pancake syrup, it is way too sweet and will ruin your pork, trust me), Dijon mustard, cider vinegar and soy sauce together. Pour over browned pork loin pieces. Cover and cook on low for 8 hours (my crockpot took only six hours). If you use a different cut of pork, you may have to use the full 8 hours. It isn't absolutely necessary, but try and turn the meat over a couple of times during the cooking process. When it is time to eat, thicken the gravy. I served this with rice and coleslaw. It also made delicious sandwiches the next day.

NOTE: If you are concerned about the maple flavor being overpowering...don't be. As a matter of fact, it is almost a background flavor, but it IS there and the meat was extremely tender and slightly sweet. This is a fantastic recipe for any special occasion. My hubby is a pineapple addict, so I'm sure the next time I make this we will try adding a little pineapple. This recipe is definitely going into my "keeper" file.

Monday, October 5, 2009

CHICKEN BAKED POTATOES and CHICKEN AND DUMPLINGS

This weekend was cold, rainy, gloomy and leaf-less; without falls bright yellow leaves everything looks so dreary. We've had several hard freezes and the snow line on the mountain behind our house is creeping very near; it won't be long. To celebrate the completion of our annual "winterizing", we decided to enjoy a lazy weekend. Saturday, I put chicken breasts and veggies in the crockpot and at dinner time, I just thickened the broth and served it on split baked potatoes. We also had some of those brown and serve dinner rolls I posted last week...very satisfying meal.


4 boneless, skinless chicken breasts
3 cups chopped veggies
½ cup chopped onion
1 cup chopped celery
1 cup chopped carrot
4 cups good quality chicken broth (not bullion)
pinch of dried thyme
pinch of poultry seasoning
pinch of dried basil
½ teaspoon black pepper
1 teaspoon salt
Saute onions in a little butter until they mellow, then put everything in the crockpot and cook on low for about 6 to 8 hours (check for chicken tenderness at 6 hours). You want the chicken to be nice and "fall apart" tender. Thicken broth and serve over large baked Yukon gold potatoes that are cut in half.

On Sunday, I used the crockpot leftovers for another lazy day meal, Chicken and Dumplings.
My mother made wonderful chicken and dumplings, so Sundays dinner was a trip down memory lane for me...Hubby, not so much. He courageously gave the dumplings a taste then gave me one of those squinty sidewards "I don't think so" glances and politely moved the dumplings over to the side of the bowl and ate everything else. Oh well, I enjoyed them thoroughly.

In a saucepan, cook 3 diced potatoes in seasoned (salt & pepper) chicken broth. Add them to the crockpot leftovers. For chicken and dumplings you want a liquid that is the consistency of gravy. If your leftovers seems to thick, add just a little bit of the chicken broth you boiled the potatoes in. If it seems too thin, thicken it with a little bit of corn starch slurry. When your gravy is the right consistency, bring it to a strong simmer.

Dumplings
2 cups all purpose flour
2 teaspoons baking powder
1 teaspoon chicken bullion granules
2 tablespoons melted butter
3/4 cup milk
pinch of poultry seasoning

Mix everything JUST UNTIL MOISTENED and let it sit for about 5 minutes. Drop heaping teaspoons of dumpling mixture onto the SURFACE of the simmering gravy. Put a TIGHT FITTING lid on the pan and cook for 15 minutes (do not peek). At the end of 15 minutes, test the dumplings for doneness with a toothpick. If they are not cooked thoroughly, put lid back on and cook another 5 minutes. Spoon gravy over dumplings before serving.

Monday, May 4, 2009

CROCKPOT TURKEY BREAST

Have you ever cooked a whole turkey breast in the crockpot? I did, for the first time, this weekend, and I can tell you I will be doing it again and again. It was super tender without being dried out (in fact it was quite moist and flavorful) and it makes enough broth to make a wonderful gravy too!

5½ pound bone-in turkey breast
1 envelope dry onion soup mix
3 stalks celery chopped
½ cup chicken broth
black pepper

Wash and pat dry your turkey breast. Trim the meat so that it will fit into the crockpot ( I had to remove a little of the rib bones to get it to fit into my crockpot). Coat the surface of the turkey with minimal butter and rub the dry onion soup mix and pepper all over the surface of the turkey. Put the chopped celery into the bottom of the crockpot and add ½ cup of chicken broth. Lay the turkey breast (breastbone side down) on top of the chopped celery. Cook on high one hour, then on low for 7 hours.

NOTE: The only drawback to this recipe (and to me it is no big deal) is that you do not get the traditional crispy turkey skin with this cooking method, so I suggest you carve the turkey before you bring it to the table.
NOTE: You are going to be tempted to add more than ½ cup of broth to the crockpot, but do not. The turkey will produce plenty of liquid.
NOTE: Everyone’s crockpot cooks at a different temperature, so you will have to decide how long you cook it. We like our turkey to come easily off the bone, and that took 1 hour on high and 7 hours on low for a 5½ pound (bone-in) turkey breast.
I was thrilled to find this cooking method for turkey breast. I can see so many uses for it like extra turkey if you are having a big holiday dinner, great for turkey sandwiches, casseroles, soups, salads, etc. Tons of possibilities, not to mention a great way to have a nice hot turkey dinner without heating up the kitchen this summer.

Search This Blog

Popular Posts

Like This

 
Copyright © 2011. Area Information: CROCKPOT RECIPES . All Rights Reserved
Company Info | Contact Us | Privacy policy | Term of use | Widget | Advertise with Us | Site map
Template modify by Creating Website. Inspired from CBS News