
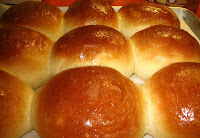
This recipe really is nearly fool proof (I've been making it exactly like this for almost 40 years). I hope you will surprise your family with these easy and light as air bread rolls.
5 cups all purpose flour
3 tablespoons granulated sugar
1 tablespoon table salt
2 tablespoons dry active yeast (or 2 envelopes)
3 tablespoons vegetable oil
2½ cups very warm water
In the bowl of a stand mixer, place 2 cups of all purpose flour, 2 packets of dry active yeast (I use 2 tablespoons because I buy it in a larger jar), 3 tablespoons of granulated sugar, 1 tablespoon of table salt and 3 tablespoons of vegetable oil (I use canola oil). Stir together and let it sit for about 10 minutes.
 NOTE: Normally, most yeast recipes have you dissolve the active dry yeast in water that is 110 degrees before you add it to the flour. However, 99.9% of the time I do not do it that way. If you mix the dry yeast into the dry flour, you can add even hotter water because the flour will cool down the water before it can damage the yeast. That may sound complicated, but it isn't. The warmer water will jump start your yeast and your dough will raise faster with this method. It works so well that it is the only way I make bread (I use water that is 120 degrees). You can use an instant read thermometer to check the temperature of your water (when you first start to work with yeast) although you will quickly learn what temperature the water is by just holding your hand under the faucet.
 Stir 2½ cups of 120 degree water into the flour mixture and stir vigorously with a wooden spoon while you pour. Let this mixture sit for about 10 minutes.
Add the rest of the flour (half cup at a time) beating well in between. When the dough gets too hard to mix with your spoon, attach your dough hook to your stand mixer and turn on low.
 Shag is not totally a bad thing, it is just a clue that it is NOT time to add more flour yet. NEVER ADD MORE FLOUR IF YOU CAN SEE SHAG.
 Don't panic if you see shag, just keep "kneading" with your dough hook (or by hand) and the shag will eventually incorporate into the wet dough. Don't add more flour until it looks more like this:
 Eventually, you will get all 5 cups of flour into the dough. When that happens, let your machine knead the dough (gently, on a low setting) for about 6-8 minutes. Stop you mixer every once in a while and pull all the dough off of the dough hook, scrape down the walls of your bowl and turn the ball of dough completely over and start the mixer again. You will have to do this a few times until the shag totally disappears and the dough clings together in a nice semi-solid "lump".
 See how the dough ball has "cleaned" all of the little bits off of the bottom and sides of the bowl? This is what you want to see. The dough will not be sticky and it will feel like Play doh when you touch it. If the dough is too soft, it will pull itself off of the dough hook. If that happens, add another quarter cup of flour and knead it a little longer.
 Place this covered bowl of dough in a nice warm place in your kitchen. Room temperature is OK, but if you have a warmer place (less than 100 degrees) place it there. After an hour, your dough will have risen substantially, (hopefully doubled in size).


5 cups all purpose flour
1 tablespoon table salt
2 tablespoons dry active yeast (or 2 envelopes)
3 tablespoons vegetable oil
2½ cups very warm water
In the bowl of a stand mixer, place 2 cups of all purpose flour, 2 packets of dry active yeast (I use 2 tablespoons because I buy it in a larger jar), 3 tablespoons of granulated sugar, 1 tablespoon of table salt and 3 tablespoons of vegetable oil (I use canola oil). Stir together and let it sit for about 10 minutes.
Stir 2½ cups of 120 degree water into the flour mixture and stir vigorously with a wooden spoon while you pour. Let this mixture sit for about 10 minutes. Add the rest of the flour (half cup at a time) beating well in between. When the dough gets too hard to mix with your spoon, attach your dough hook to your stand mixer and turn on low.
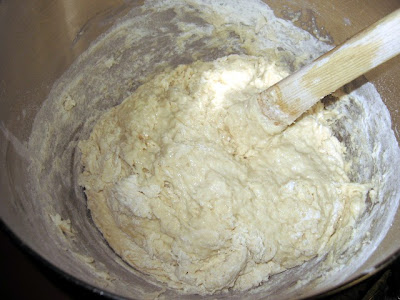
Now here's a tip: When making dough, at this stage, something I call "shag" can be your enemy. If you add too much flour, too fast, you will get "shag" or shaggy pieces of dough.
In the next photo, see the dry white sections/layers next to the wet dough? That's what I call "shag".
Click on the photo to see the shag more clearly
Shag is not totally a bad thing, it is just a clue that it is NOT time to add more flour yet. NEVER ADD MORE FLOUR IF YOU CAN SEE SHAG.
In the next photo, I intentionally added the flour too quickly (before the previous flour was well mixed in), so that you could see the "shag" that I'm talking about.
Click on photo to get a better look
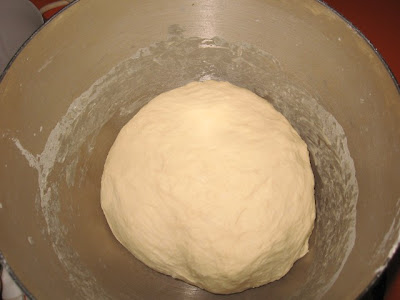
Don't panic if you see shag, just keep "kneading" with your dough hook (or by hand) and the shag will eventually incorporate into the wet dough. Don't add more flour until it looks more like this: Eventually, you will get all 5 cups of flour into the dough. When that happens, let your machine knead the dough (gently, on a low setting) for about 6-8 minutes. Stop you mixer every once in a while and pull all the dough off of the dough hook, scrape down the walls of your bowl and turn the ball of dough completely over and start the mixer again. You will have to do this a few times until the shag totally disappears and the dough clings together in a nice semi-solid "lump".
At the end of 6 to 8 minutes (exact time is not crucial), the dough should have worked itself into a smooth ball that stays on the dough hook when you raise the hook out of the bowl. The interior sides of the bowl should be fairly clean. It should look like this:
See how the dough ball has "cleaned" all of the little bits off of the bottom and sides of the bowl? This is what you want to see. The dough will not be sticky and it will feel like Play doh when you touch it. If the dough is too soft, it will pull itself off of the dough hook. If that happens, add another quarter cup of flour and knead it a little longer.
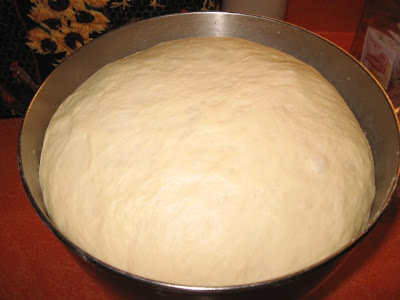
Remove your dough from the dough hook, form it into a ball and place it in a greased bowl (I use Pam). Spray the top of the dough with a little Pam, and cover it with plastic:
 Place this covered bowl of dough in a nice warm place in your kitchen. Room temperature is OK, but if you have a warmer place (less than 100 degrees) place it there. After an hour, your dough will have risen substantially, (hopefully doubled in size).
Your risen dough should look like this
When the dough has fully risen, turn it out onto your counter (some people say flour the counter at this stage, but I NEVER do) and push all of the air out of the dough, form it into a ball and cover it with an inverted empty bowl and let it sit for 15 minutes to relax (this will make your dough much easier to work).
Depending on how you want to shape your dough, follow these general directions, but use your imagination. For a loaf of bread, depending on the size of your loaf pan, this recipe will make 2 or 3 loaves. If you are using a big loaf pan, cut the dough in half. Roll it out into a large rectangle and then roll it up, pinching the ends shut. Place in greased loaf pan. spray the top of the dough with a spritz of cooking spray and cover loosely with plastic wrap. Let raise for an hour or until doubled in size.
If you are making rolls, just pinch off pieces about the size of a plum and roll them into a ball. Place in a greased baking dish (lightly touching each other) and spritz the top with a little cooking spray and cover with plastic wrap. Let raise for an hour or till doubled in size.
Bake the loafs in a 400 degree preheated oven for 25 minutes. Remove from pan immediately. Bake rolls at 400 for about 18-20 minutes or until golden, remove from pan immediately and brush crust with butter (optional).
NOTE: Yeast comes in little envelopes ¼ ounce envelopes (2¼ teaspoons per envelope). However, I buy yeast by the jar, so I always just use a tablespoon of yeast (3 teaspoons). Any dry active yeast will work.
NOTE: You will have much more success in your bread making if you understand that the amount of flour that goes into a recipe varies from day to day. Many serious bakers weigh their flour, but I find that keeping a close eye on how the flour is "behaving" works better than weighing. On a humid day it may take an extra tablespoon, on a rainy day a tablespoon less. So be stingy with that last half cup of flour until you see how the dough acts in YOUR climate. Keep in mind that the less flour you use, the more moist your bread will be.
NOTE: A lot of people have granite counter tops which are always cool to the touch. This will effect the length of time your bread takes to raise. I suggest that you find a warmer place to let your bowl of dough raise than on the granite.

Post a Comment